Menambahkan HDD Baru Pada VE 5 ini biasanya dikarenakan untuk penambahan vm baru, penyimpanan backupan vm sudah tidak mencukupi atau hal lainnya. Pada tutorial ini penambahan hdd dengan kapasitas 2TB. Sebelum melakukkan penambahan hdd baru, pastikan semua vm sudah dalam kondisi mati. Karena nantinya proxmox akan dimatikan perlebih dahulu sebelum dimasukkan hdd yang baru. Berikut tutorial langkah-langkahnya
1. Pastikan semua VM dalam kondisi mati.
2. Shutdown Proxmox VE
3. Masukkan HDD yang baru
4. Nyalakan server
5. Klik Proxmox Node > Disks
hdd yang baru sudah terbaca pada /dev/sda
6. SSH ke server Proxmox VE dan masukkan perintah berikut

1 | fdisk /dev/sda |
7. Buat partisi baru, Ketik n enter
1 2 3 4 | Welcome to fdisk (util-linux 2.29.2).Changes will remain in memory only, until you decide to write them.Be careful before using the write command.Command (m for help): n |
8. Pilih tipe partisi, ketik p enter
1 2 3 4 | Partition typep primary (0 primary, 0 extended, 4 free)e extended (container for logical partitions)Select (default p): p |
9. Nomor partisi, gunakan default dengan menekan enter 3x
1 2 3 4 5 | Partition number (1-4, default 1):First sector (2048-16777215, default 2048):Last sector, +sectors or +size{K,M,G,T,P} (2048-16777215, default 16777215):Created a new partition 1 of type 'Linux' and of size 1,82TB GiB. |
10. Save partisi, ketik w enter
1 2 3 4 | Command (m for help): wThe partition table has been altered.Calling ioctl() to re-read partition table.Syncing disks. |
11. Format partisi dengan perintah berikut
1 | mkfs.ext4 /dev/sda1 |
12. Buat direktori penyimpanan, dan mounting partisi ke direktori tersebut
1 2 | mkdir -p /mnt/data/backup/mount /dev/sda1 /mnt/data/backup/ |
13. Buat auto mounting partisi
1 | nano /etc/fstab |
masukkan berikut pada baris paling bawah
1 | /dev/sda1 /mnt/data/backup ext4 defaults 0 2 |
14. Klik Datacenter > Storage > Add, pilih Directory
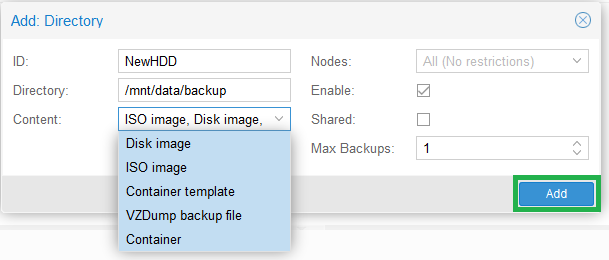
15. Masukkan ID, Directory, Content sesuai berikut, kemudian klik Add
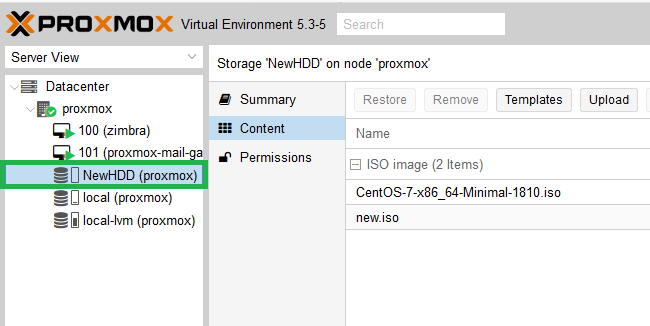
16. Bila berhasil akan tampil storage baru seperti berikut

Semoga bermanfaat..
sumber -> https://saad.web.id/2020/01/menambahkan-hdd-baru-pada-proxmox-ve-5/


